Use document template tools in eSignatures
Creating document fields
Creating fields
To create a field, click on the field you wish to add to your document and then drag and drop it into the document. After placing a field into the document, you can click and drag to move the field.
Deleting fields
You can delete a field by clicking on it, then pressing delete/backspace or clicking the trash icon in the field details.
Document view
The bar on the right side allows you to scan each page of the document and navigate quickly to other pages. To display this bar, unselect all fields.
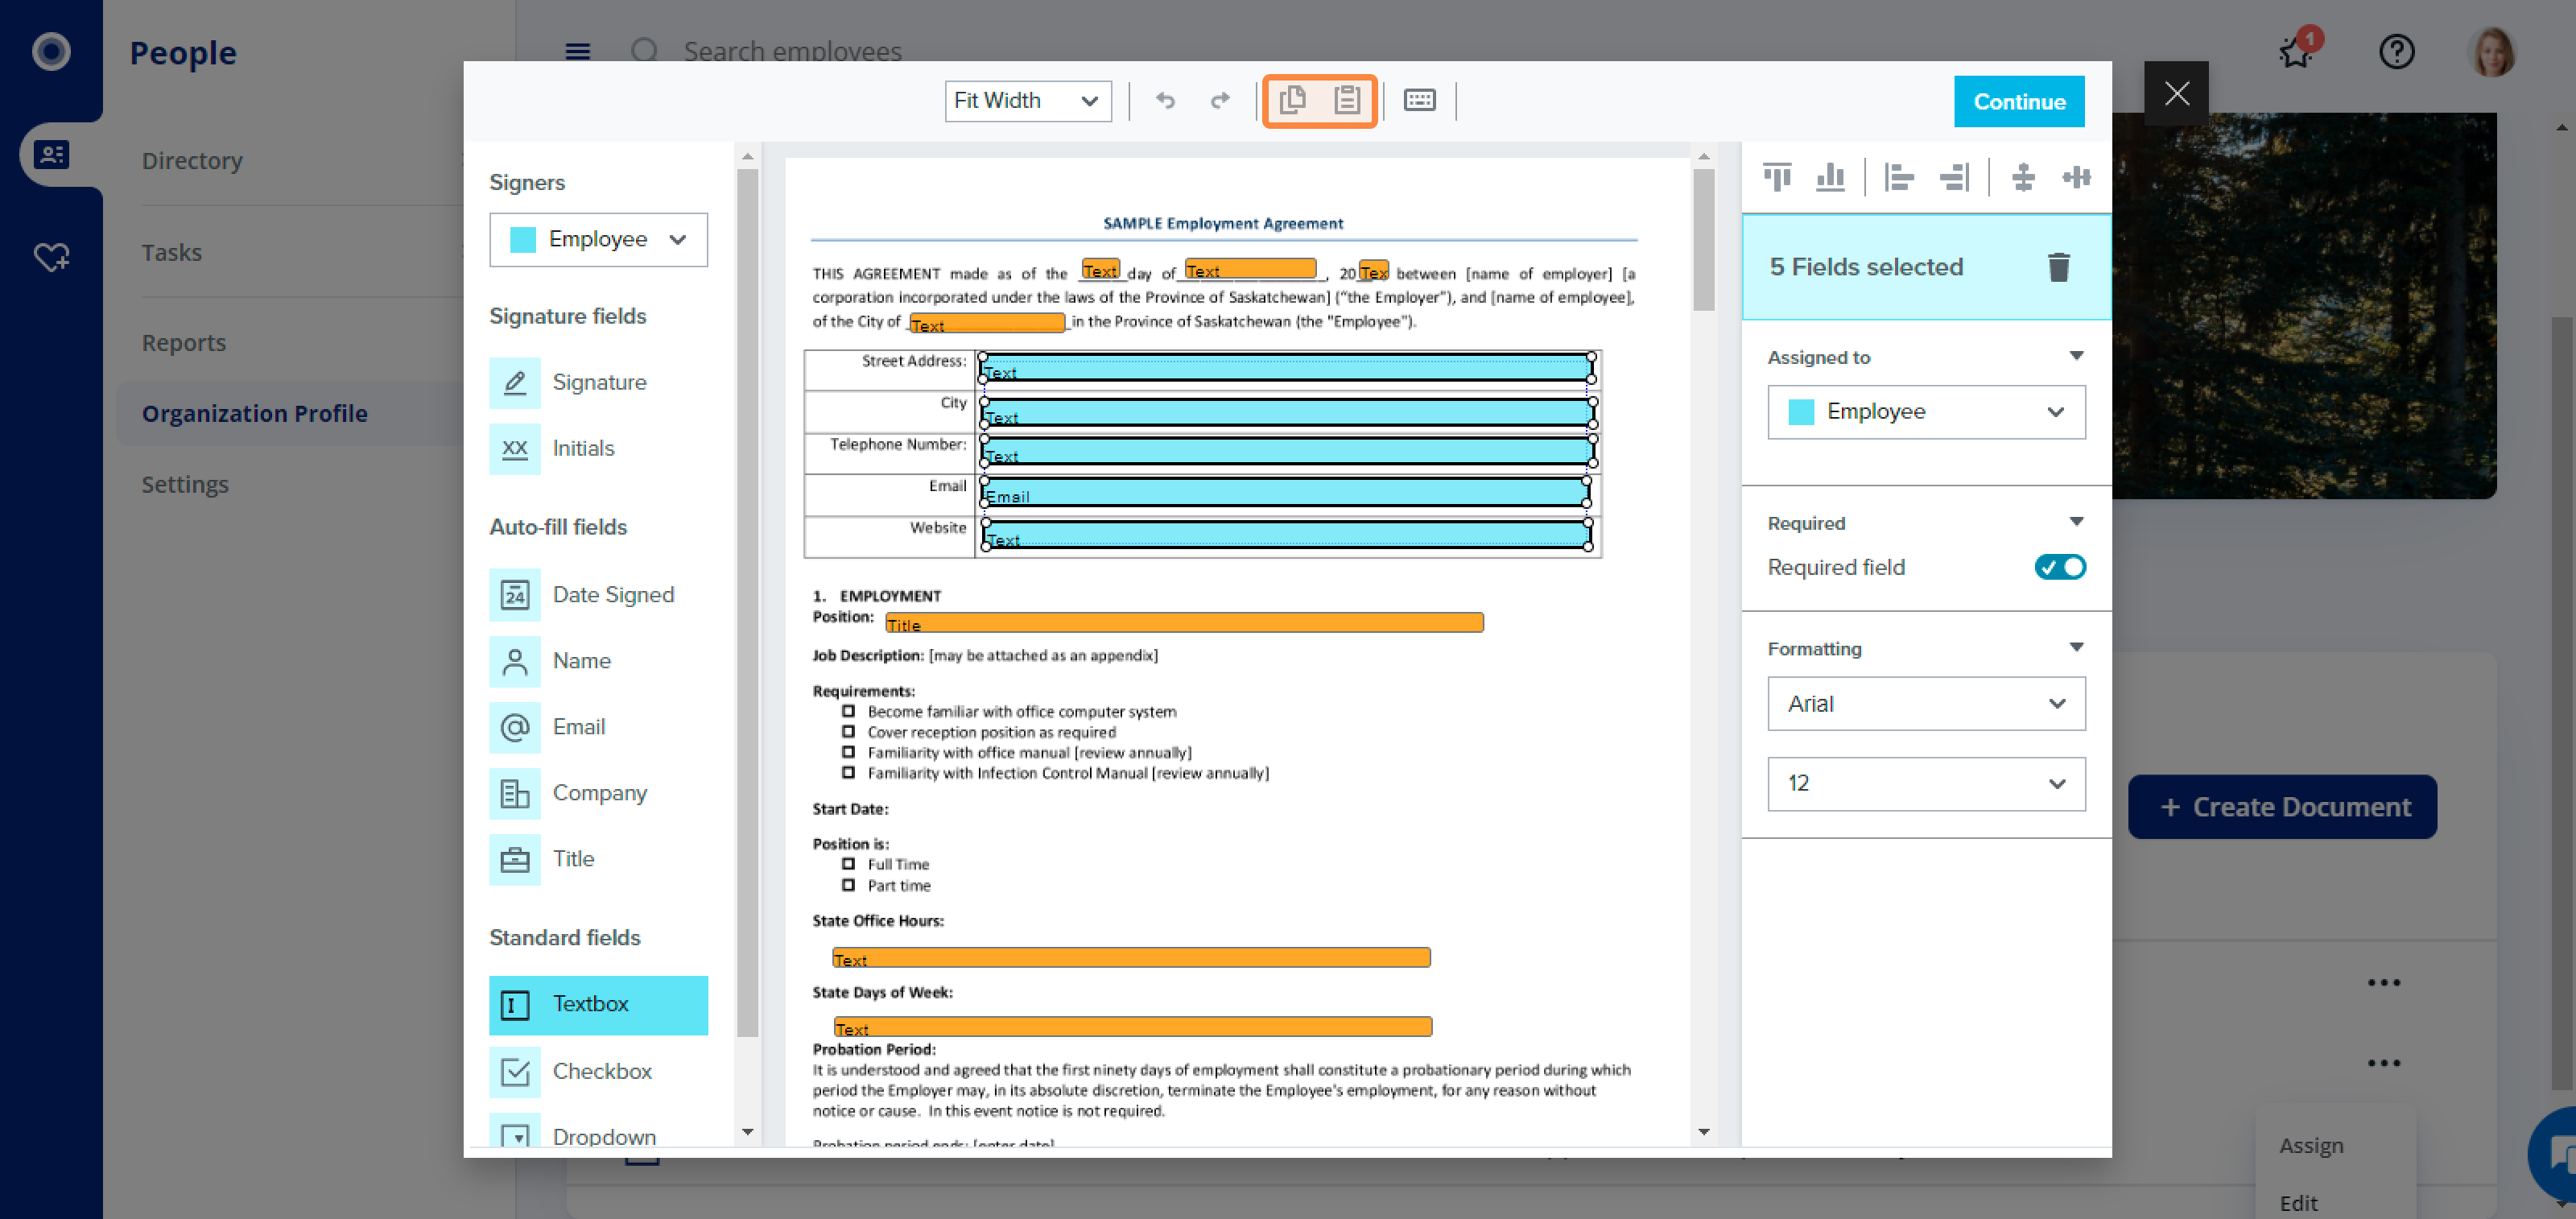
Selecting multiple fields
You can select multiple fields two ways: by holding down the Command key on a Mac or Control key on a PC and clicking the fields you wish to edit, or by keeping your mouse clicked and drawing a square around the fields. This allows you to edit the options the selected fields have in common.
Using document tools
Zoom
Use the dropdown to choose the size of the document on your screen.
Undo/Redo
Use these buttons to reverse (undo) or redo actions.
Copy/Paste
Use these buttons to replicate fields and text—this tool is useful if you have many fields with customized options.
Keyboard shortcuts
This is a handy guide to the keyboard shortcuts. You can use this to help you create document templates more quickly.
Creating signature fields
Signature
Use this field to create a space for a signature. To quickly see who the field is assigned to, hover your cursor over the box.
Initials
Use this field to create a space for initials. To quickly see who the field is assigned to, hover your cursor over the box.
Signature fields options
You can customize your signature fields using the options on the right sidebar when a field is selected. Not all options are available for each field.
- Assigned to: allows you to choose who the field is assigned to. These roles are created when the document template is created—for more information on this, check out our How to create and edit a document template article. Each field is color-coded to match with the field assignee. If you choose Me (now), you will be able to input the information directly into the template and it will appear on the document when you assign it to employees.
- Required field: allows you to choose whether or not a field must be completed.
- Field name: allows you to give the field a name to distinguish it from other fields of the same type.
Creating auto-fill fields
Auto-fill fields
The Date Signed, Name, and Email fields are automatically populated based on existing data pulled from Rise. However, the Company and Title fields need to be filled in manually.
Date Signed
Place this field where a date is required. You can use the Assigned to option for this field to control your date settings. If you choose Me (now), the document date will be auto-filled with the date the document is assigned. If you choose another role , they will be asked to fill out the date when they sign the document.
You can use the drop-down menu under Formatting to choose the date format (e.g. YYYY/MM/DD). This date format will be applied to all dates in the document—you cannot have different date formats in the same document.
Name
Use this field to create a space for a name. You can use the Type dropdown to choose if a Signer’s First Name, Last Name, or Full Name should be used in the field.
Email
Use this field to create a space for a Signer’s email.
Company
Use this field to create a space for a Signer’s company name.
Title
Use this field to create a space for a Signer’s title.
Auto-fill field options
You can customize your auto-fill fields using the options on the right sidebar when a field is selected. Not all options are available for each field.
- Assigned to: allows you to choose which employee’s information will be used to auto-fill the field. who the field is assigned to. These roles are created when the document template is created—for more information on this, check out our How to create and edit a document template article. Each field is colour-coded to match with the field assignee. If you choose Me (now), you will be able to input the information directly into the template and it will appear on the document when you assign it to employees.
- Required field: allows you to choose whether or not a field must be completed.
- Formatting: allows you to change the font and size of the text in a field.
- Field name: allows you to give the field a name to distinguish it from other fields of the same type.
Creating standard fields
Standard fields give you the option to have checkbox fields or have custom text boxes within your document for greater flexibility. They have the same Assigned to, Required field, Formatting, and Field name options that auto-fill fields have.
Text
Use this field to create a space for text. In the details bar for this field, you have several options to customize your text field.
- Mask typed text: Text here will appear as asterisks (e.g. ******) to other signers and on the final PDF. Use this to protect sensitive information—for more information on this, check out HelloSign’s Masking Sensitive Information article.
- Placeholder text: We recommend adding instructions here to let the Signer know what they should write in the text box.
- Validation: Use this dropdown to control what the user may type into the box (e.g. letters only, numbers only, phone number)
Checkbox
Use this field to create a checkbox. You have the option to have the checkbox either unchecked or checked as a default.
Dropdown
Use this field to create a dropdown menu with a selection of choices. Under Options, type in the dropdown options, separated by a comma, semicolon, or line break. You have the option to have the checkbox either unchecked or checked as a default. If you would like an option to be selected as the default, choose this option under Default options.
Radio buttons
Use this field to allow users to choose from two or more options. In the details bar for this field, you have several options to customize your radio buttons.
- Adding more options: Click the + sign at the bottom to add another radio button.
- Changing the placement of radio buttons: To rearrange the radio buttons (ie. going from horizontal or vertical, or arranging them to match the placement on a form), you can click and drag the button you wish to move.
- Radio names: Use this to label your radio button options.
Conditional logic
You can use conditional logic to control how your document appears to signers, depending on which options are chosen. This is available for all standard fields. For more information on using conditional logic, check out HelloSign’s Adding Conditional Logic to Documents article.
Related Articles
Create and edit a document template in eSignatures
Creating an eSignature template 1. In People, click Organization Profile, then eSignatures. 2. Next, click + Create Document. 3. Choose the document you would like to create a template for by dragging it into the box or clicking Choose a file to open ...Acknowledge a document
When a document acknowledgment is assigned to you, you will receive an in-app notification in your Rise profile and an email. You will see a task assigned to you labelled "Acknowledgement Required". You can open the document by clicking the link in ...Assign a document in eSignatures
1. Click the Organization Profile tab, then click eSignatures. 2. Next, click the category of the document you’re looking for. 3. To assign an eSignature document template, click the three dots next to the document template name and click Assign. ...FAQ: eSignatures
Q: Can I have more than one signer for the same copy of a document? A: Yes, you can assign a document to 3 cosigners. Q: Can I unassign/cancel a document? A: Yes, you can unassign/cancel a document if its status is In Progress. Q: Can I send ...How to edit a task template
1. Navigate to the Tasks section in People. 2. Select Task templates and click the name of the template you want to edit. To edit the template name or description: 1. Click the three dots menu in the upper right corner, the select Edit template. 2. ...