How to manage your Time Approval settings in Rise Scheduling & Time Tracking
How to access Organization Settings
1. In Scheduling, click Time Approval Settings on the navigation menu on the left-hand side.
Time zone for punches
Use the dropdown to choose the time zone for punches to be registered in.
Match Tolerances
Match tolerances allow employees to be considered on time even if they don’t punch in and punch out at the exact minute their shift begins or ends.
There are three ways you use match tolerances:
1. Use Match Tolerances Based on your Schedules for close matching to schedules
By selecting this option it includes exact match and close match tolerance. In each exactly box (Arriving Early, Arriving Late, Leaving Early, and Leaving Late), input how many minutes off schedule an employee can be and still be considered on time.
The close to time is relative to the exact time. In each close to box, input how many minutes relative to the ‘Exactly’ time an employee will be considered close to being on time. If an employee punches in or out within this window, you’ll see a yellow warning in Time Approval.
In the screenshot above, the Arrive Early Exactly is set to 15 minutes and the Arrive Early Close to is set to 15 minutes. With these settings, if an employee who’s scheduled for an 8:00am shift punches in at 7:57am, they will be considered on time. If that employee punches in at 7:42am, a warning will appear in Time Approval and the time box will have a yellow highlight, but the employee will be considered on time. If this employee were to punch in at 7:23am, they would be considered too early and a red highlight would appear in time box in Time Approval.
2. Use Match Tolerances Based on a Time Span for close matching to schedules
This method of matching is based on punches that look like they belong together based on how close they are to each other. It is intended for places where the employees frequently do not work close to the times of their shift. This will mean that two punches will only be matched together if they satisfy the timespan criteria and there is a shift that starts on the same day (or 24-hour period) as the punches and is for the same department.
3. Use match tolerances based on a time span to match punches that don’t have a corresponding schedule.
Use this option to accommodate punches that can’t be matched to a schedule. If two punches are within the same 24-hour period, they can be matched together. If there’s a shift for that employee in that department in that 24-hour period, it’ll be matched to those punches.
However, if these punches are farther apart than the Maximum Shift Duration, there will be two separate records for the punches on the Time Approval screen.
However, the 24-hour period doesn’t have to start and end at midnight. You can use Shift reset time to determine when this 24-hour period starts and ends. For example, at a restaurant you may want the Shift reset time to be at 5:00 am to accommodate late-night shifts.
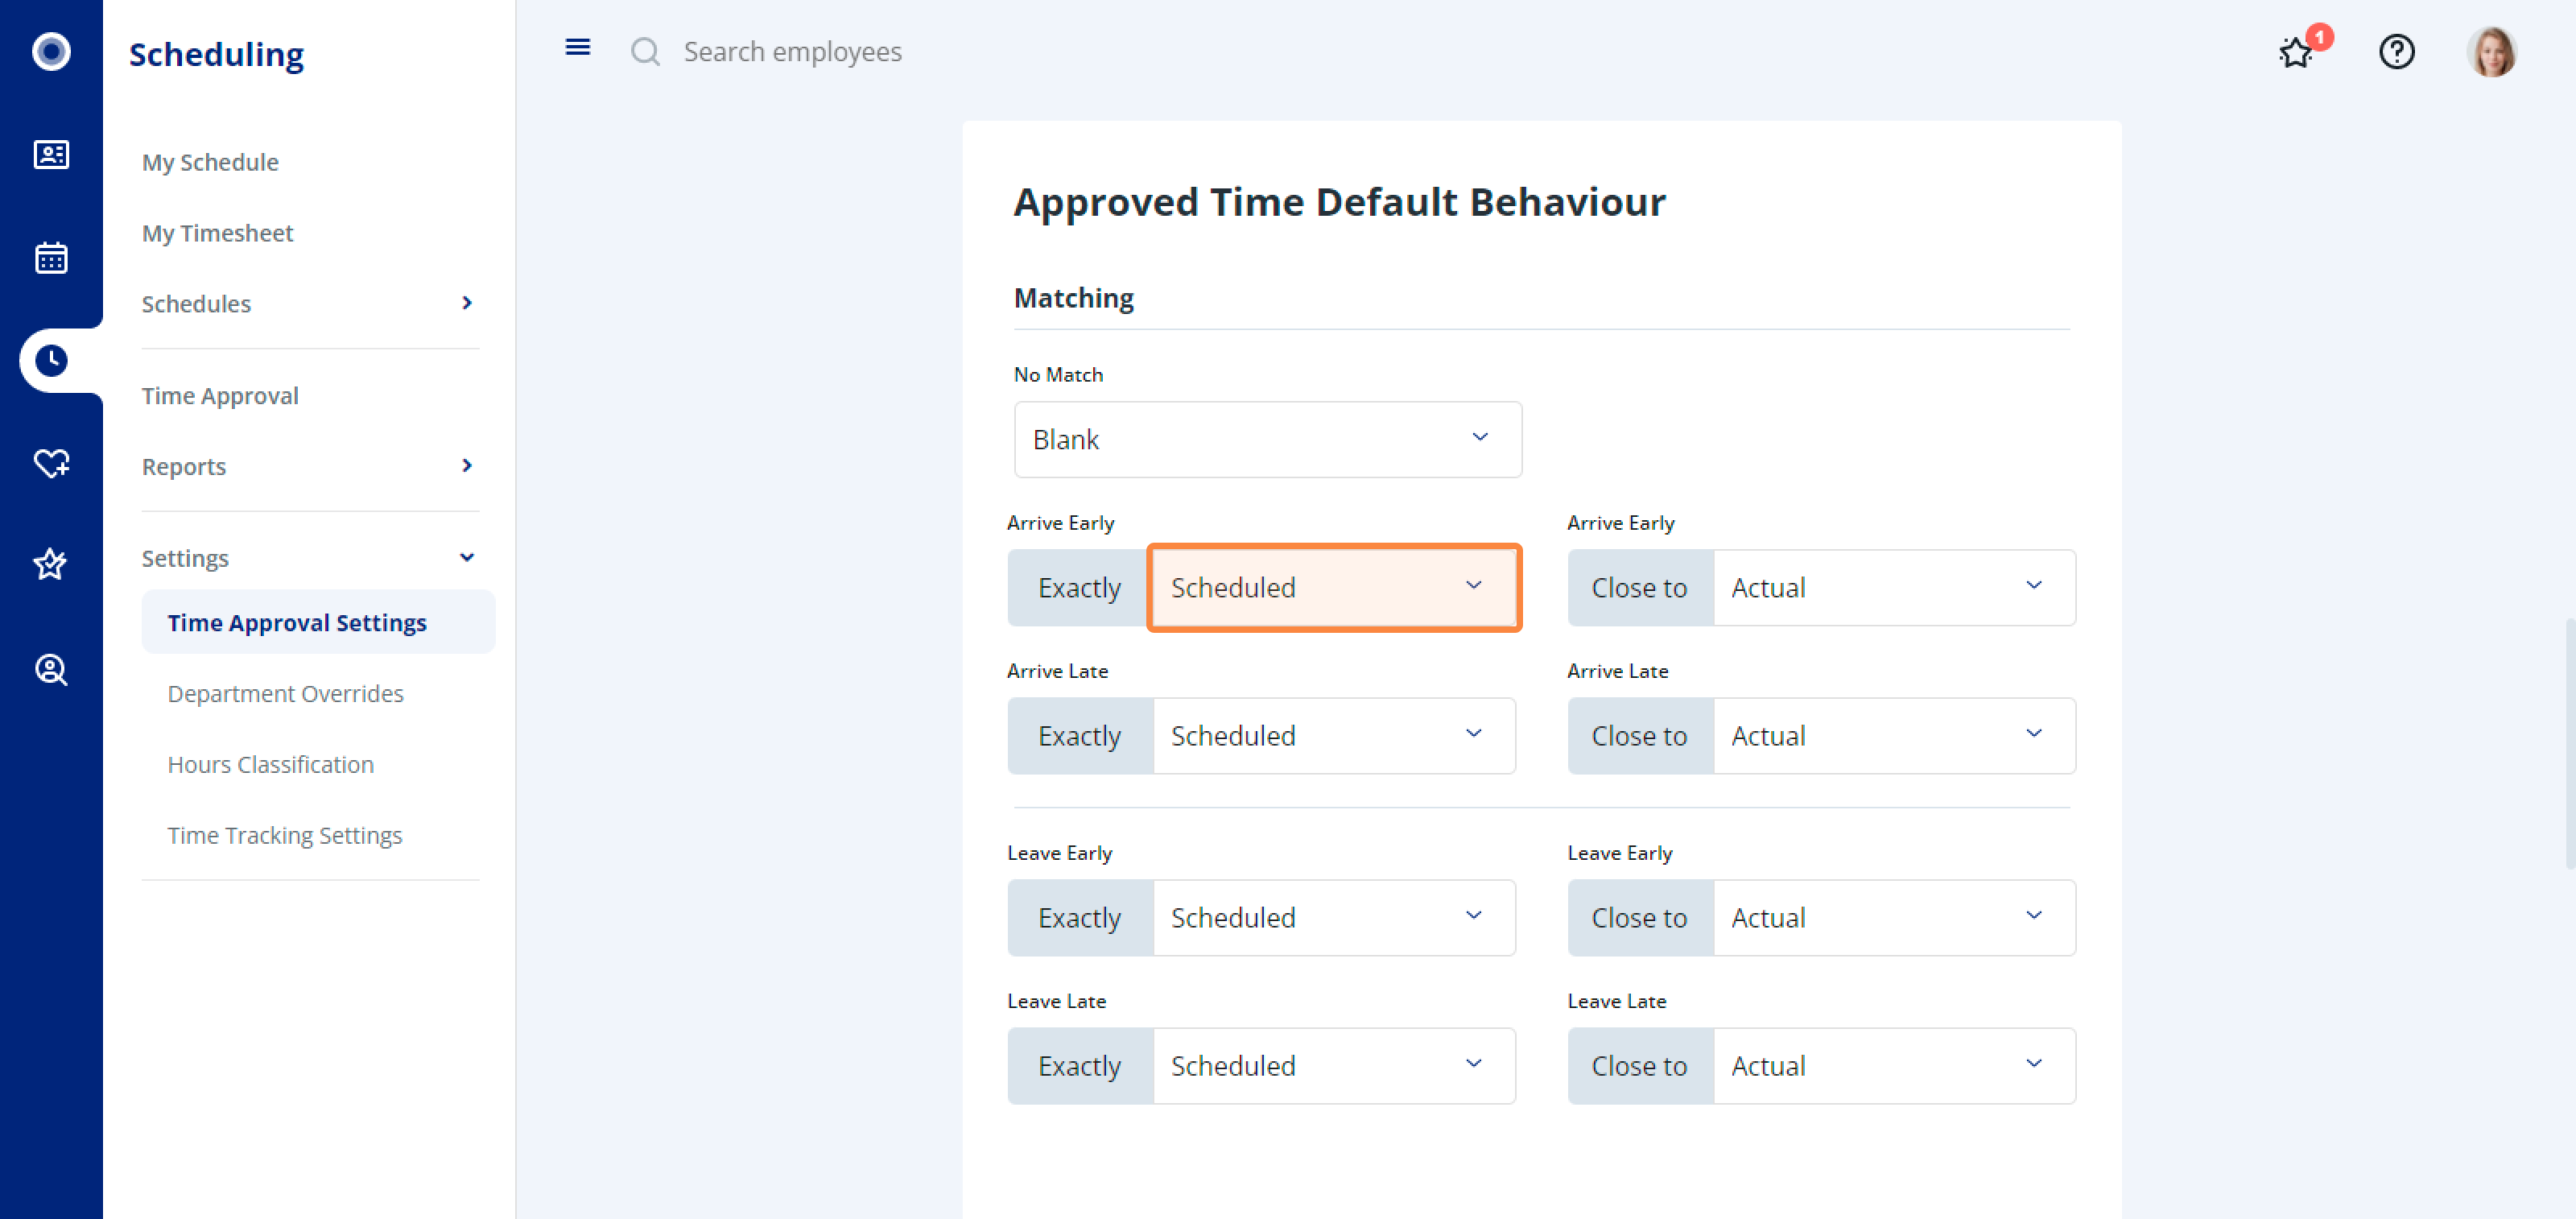
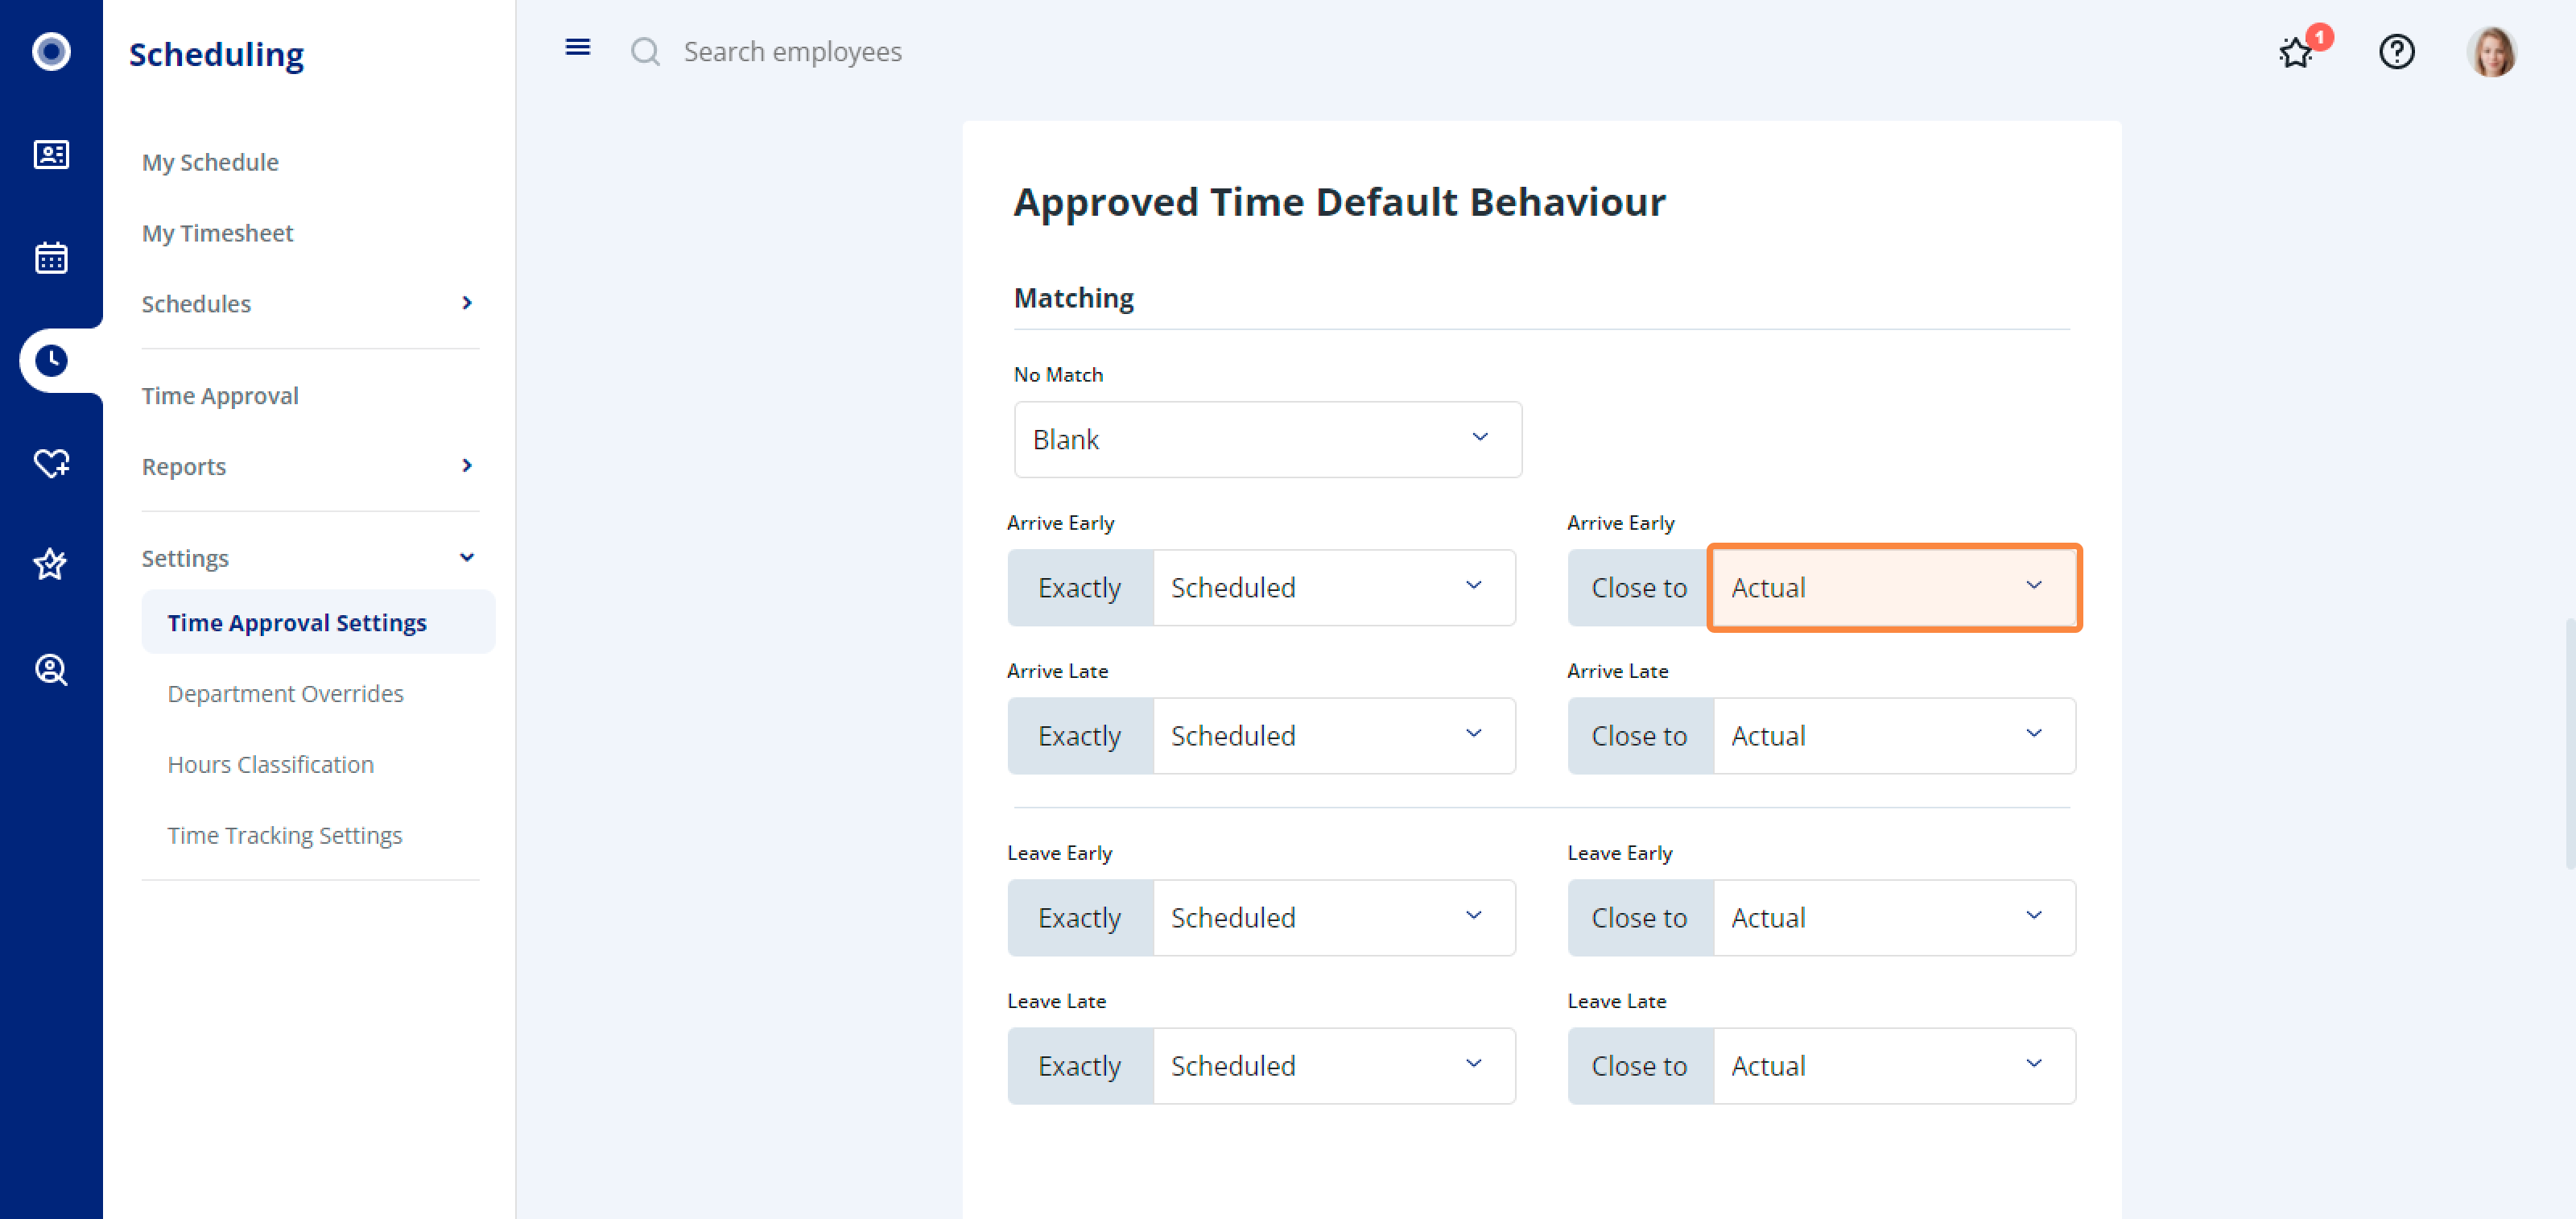
Approved time default behaviour
Approved time default behaviour is used to determine how punch times appear in the time boxes in Time Approval.
No Match
This dropdown controls the behaviour for punches that have no matching shift.
Choose Blank if you want to manually fill in the time boxes for these shifts on the Time Approval page.
Choose Actual if you want the time boxes to be filled with the actual time of the punches on the Time Approval page.
Arrive and Leave Exactly
These boxes correspond to the times input into the Arrive and Leave Exactly Match Tolerances.
There are 3 options in each dropdown:
Choose Blank if you want to manually fill in the time boxes for punches occurring within the Exactly Match Tolerance window on the Time Approval page. You will see the scheduled time and punch time below the box and in order to approve the shift, you will have to input the punch in and punch out time manually.
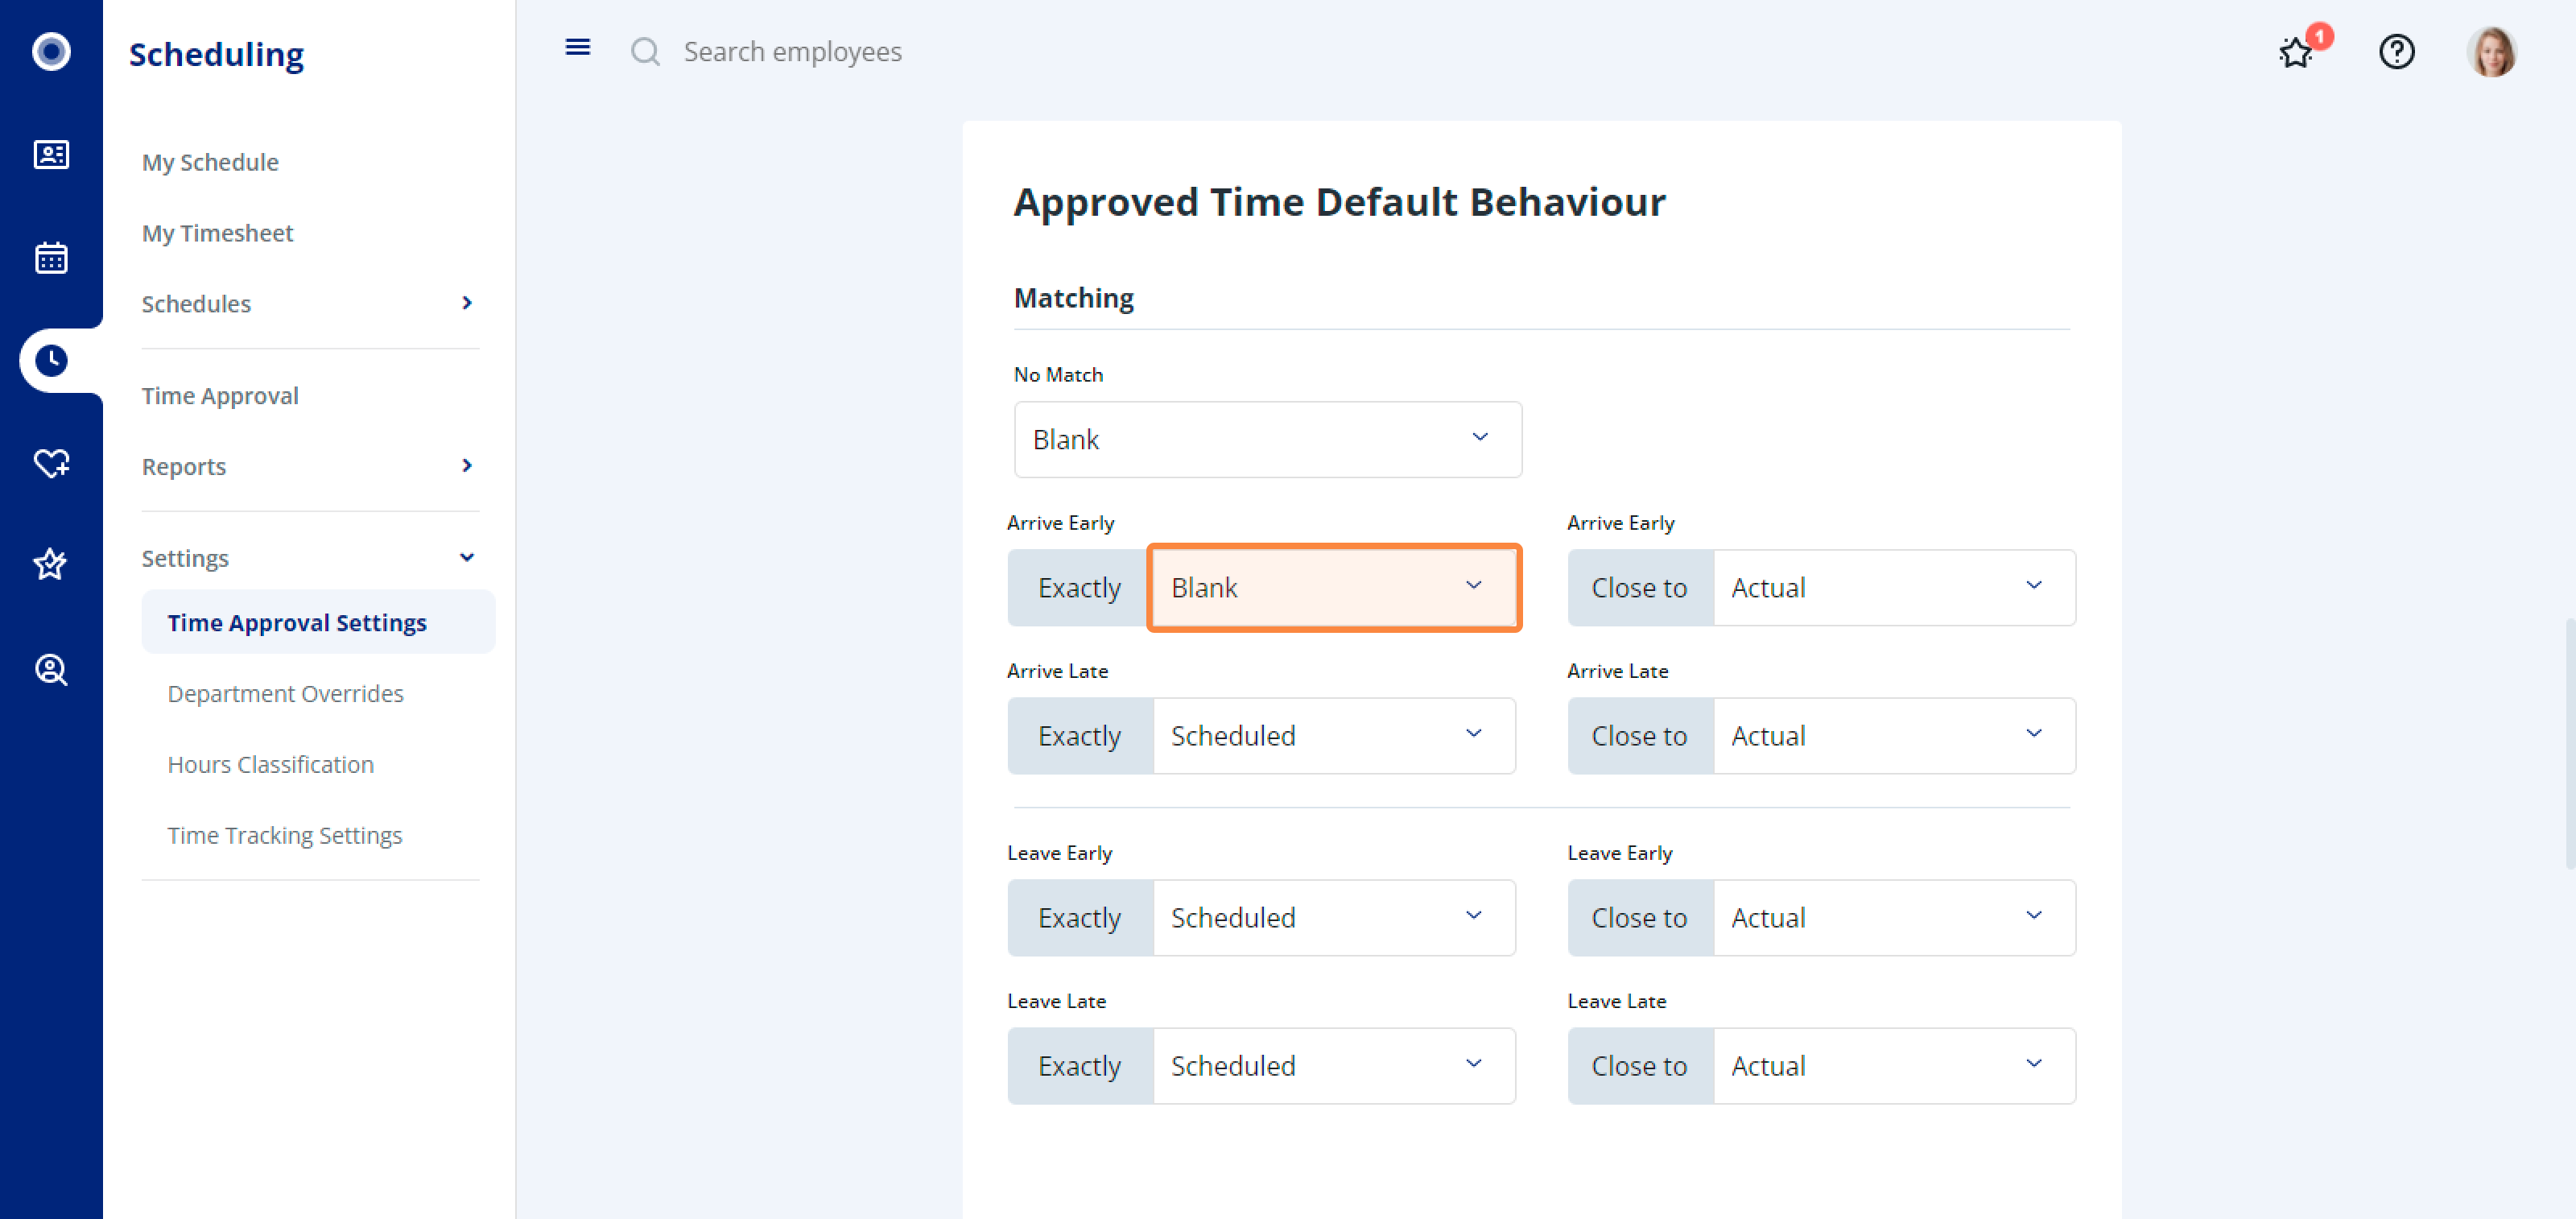
Choose Actual if you want the time boxes on the Time Approval page to be filled with the actual time of the punches occurring within the Exactly Match Tolerance window.

Choose Scheduled if you want the time boxes on the Time Approval page to be filled with the scheduled time that corresponds with the punches occurring within the Exactly Match Tolerance window.
Here are some examples of what will happen on the Time Approval page when the Exactly Match Tolerance is set to 5 minutes for all boxes:
If you use Blank, and an employee (who is scheduled from 8:00am to 3:00pm with no unpaid break) punches in at 7:57am and punches out at 3:03pm, you will see an S: 8:00am and P: 7:57am below a blank Start Time box and an S: 3:00pm and P: 3:03pm below a blank End Time box in Time Approval. In order to approve the shift, you’ll need to manually input the time you want to pay the employee for, then click Approve.
If you use Actual, and an employee (who is scheduled from 8:00am to 3:00pm with no unpaid break) punches in at 7:57am and punches out at 3:03 pm, 7:57am will appear as the time in the Start Time box, and 3:03pm will will appear as the time in the End Time box. If you click Approve, the employee will be paid for 7 hours and 6 minutes of work, not the 7 hours they were originally scheduled for.
If you use Scheduled, and an employee (who is scheduled from 8:00 am to 3:00 pm with no unpaid break) punches in at 7:57am and punches out at 3:03pm, 8:00am will appear as the time in the Start Time box, and 3:00pm will will appear as the time in the End Time box. If you click Approve, the employee will be paid for 7 hours of work, not the 7 hours and 6 minutes they worked.
Arrive and Leave Close To
These boxes correspond to the times input into the Arrive and Leave Close to Match Tolerances. There are 3 options in each dropdown:
Choose Blank if you want to manually fill in the time boxes on the Time Approval page for punches occurring in the Close to Match Tolerance window.
Choose Actual if you want the time boxes on the Time Approval page to be filled with the actual punch time for punches occuring in the Close to Match Tolerance window.
Choose Scheduled if you want the time boxes on the Time Approval page to be filled with the scheduled time for punches occurring within the Close to Match Tolerance window.

Here are some examples of what will happen on the Time Approval page when the Close to Match Tolerance is set to 10 minutes and the Exactly Match Tolerance is set to 5 minutes for all boxes:
If you use Blank, and an employee (who is scheduled from 8:00am to 3:00pm with no unpaid break) punches in at 7:48am and punches out at 2:52pm, you will see an S: 8:00 am and P: 7:48 am below a blank Start Time box and an S: 3:00pm and P: 2:52pm below a blank End Time box in Time Approval. There will also be a yellow highlight around the box to let you know the punch was within the Close to window. In order to approve the shift, you will need to manually input the time you want to pay the employee for, then click Approve.
If you use Actual, and an employee (who is scheduled from 8:00am to 3:00pm with no unpaid break) punches in at 7:48am and punches out at 2:52pm, 7:48am will appear as the time in the Start Time box, and 2:52pm will will appear as the time in the End Time box. There will also be a yellow highlight around the box to let you know the punch was within the Close to window. If you click Approve, the employee will be paid for 7 hours and 4 minutes of work, not the 7 hours they were originally scheduled for.
If you use Scheduled, and an employee (who is scheduled from 8:00am to 3:00pm with no unpaid) break punches in at 7:48am and punches out at 2:52pm, 8:00am will appear as the time in the Start Time box, and 3:00pm will will appear as the time in the End Time box. There will also be a yellow highlight around the box to let you know the punch was within the Close to window. If you click Approve, the employee will be paid for 7 hours of work, not the 7 hours and 4 minutes they worked.
Rounding
Round to the nearest allows you to choose a time for punches to round up and down to.
Round down before allows you to choose at what point the system will round up or down.
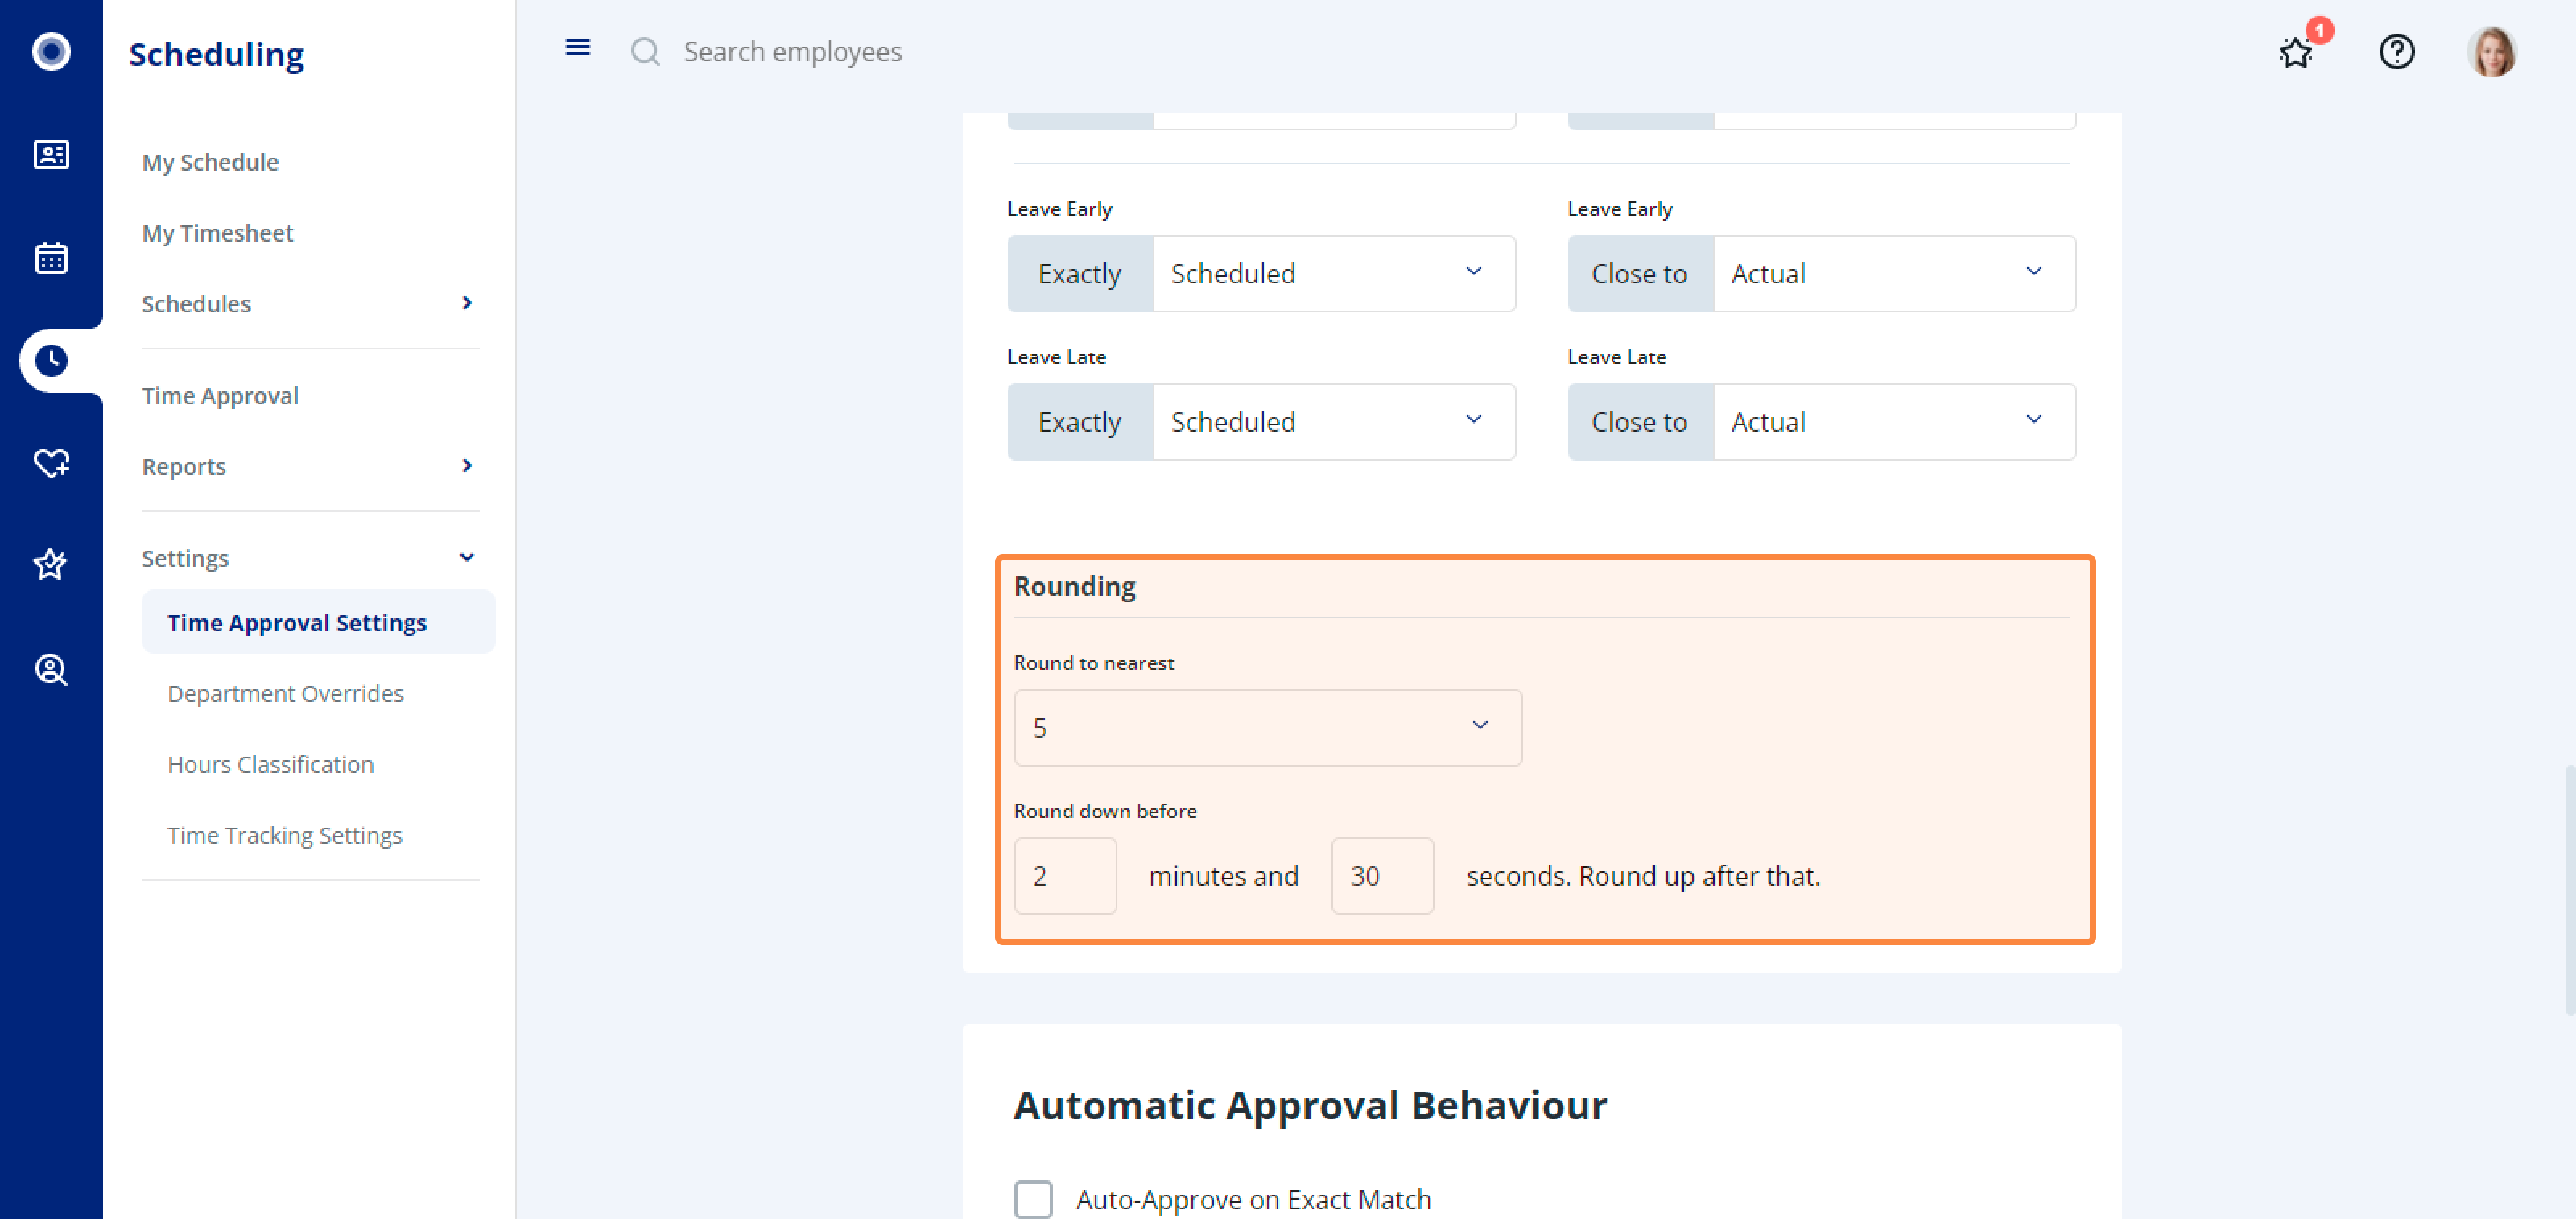
For example: Round down to the nearest is set to 5, and Round down before is set to 2 minutes and 30 seconds. Round up after that. If an employee punches in at 7:57:20am for their 8:00am shift, the punch will be recorded for 7:55. If an employee punches in at 7:57:40am for their 8:00am shift, they punch will be recorded for 8:00 am.
Automatic Approval Behaviour
Automatic approval behaviour sets the parameters for shift punches to be automatically approved.
Check Auto Approve on Exact Match if you want to automatically approve a shift with punches that fall within the Exactly parameters you’ve set.
Check Auto Approve on Close Match if you want to automatically approve a shift with punches that fall within the Exactly parameters you’ve set.
Unpaid breaks
Use unpaid breaks to create a calculation for how much break to assign for the length of a shift, based on the punch times for the shift.
For example: if you have the Break duration set to 15 minutes and Shift duration set to 4 hours and an employee works for 8 hours, they would have 30 minutes of break included on the Time Approval page. However, if an employee worked for 7 hours with this configuration, they would only have 15 minutes of break calculated for their shift.
Applying Settings
Once you’ve finished managing your settings, click Save.
Department Overrides
If you want different scheduling, time, and attendance settings for a specific department, check out our How to create a departmental override in Rise Scheduling & Time Tracking article.
Related Articles
Approve time
1. In Scheduling, click Time Approval in the navigation menu on the left-hand side. 2. You will be taken to the Time Approval page, where you can review, modify, and approve employee shifts. If your organization uses timesheets, it will also display ...How to customize Rise Scheduling & Time Tracking permissions
With Rise Scheduling & Time Tracking, you can customize the levels of access your users have, allowing you to control who can manage schedules, track time, pay employees, and administer the Rise system. You can give your employees access to these ...Navigate Rise Scheduling and Time Tracking
1. Navigate to Scheduling in Rise. 2. Here, you’ll see all your schedules. To sort your schedules by name or most recent, click the sorting arrow. 3. Use the navigation menu on the left-hand side to navigate through Rise Scheduling & Time Tracking. ...Linking Time Off policies to Scheduling & Time Tracking
Linking Time Off Policies is a part of Hours Classification settings in Scheduling & Time Tracking. To learn more about these settings, check out our About Hours Classification article. Note that all Time Off policies will automatically show up on ...How to manage timesheet settings in Rise Scheduling & Time Tracking
1. In Scheduling, click Time Tracking Settings on the navigation menu on the left-hand side. Timesheet Settings Timesheet Settings determine which pay classes use timesheets and what pay codes are available to employees within Timesheets. Owners or ...