Create a benefit pay code
Add a new payroll instruction (earning or benefit)
1. Navigate to Payroll, then click on Payroll Setup.
2. In the Payroll Instructions tab, click on Add New Earning/Benefit.
Options within the setup screen
1. The first section is titled Details. You will need to enter both the English and French name, as well as a description. If you have no French-speaking employees, these four entries could all be the same. Make sure the Instruction Type is set to Benefit.
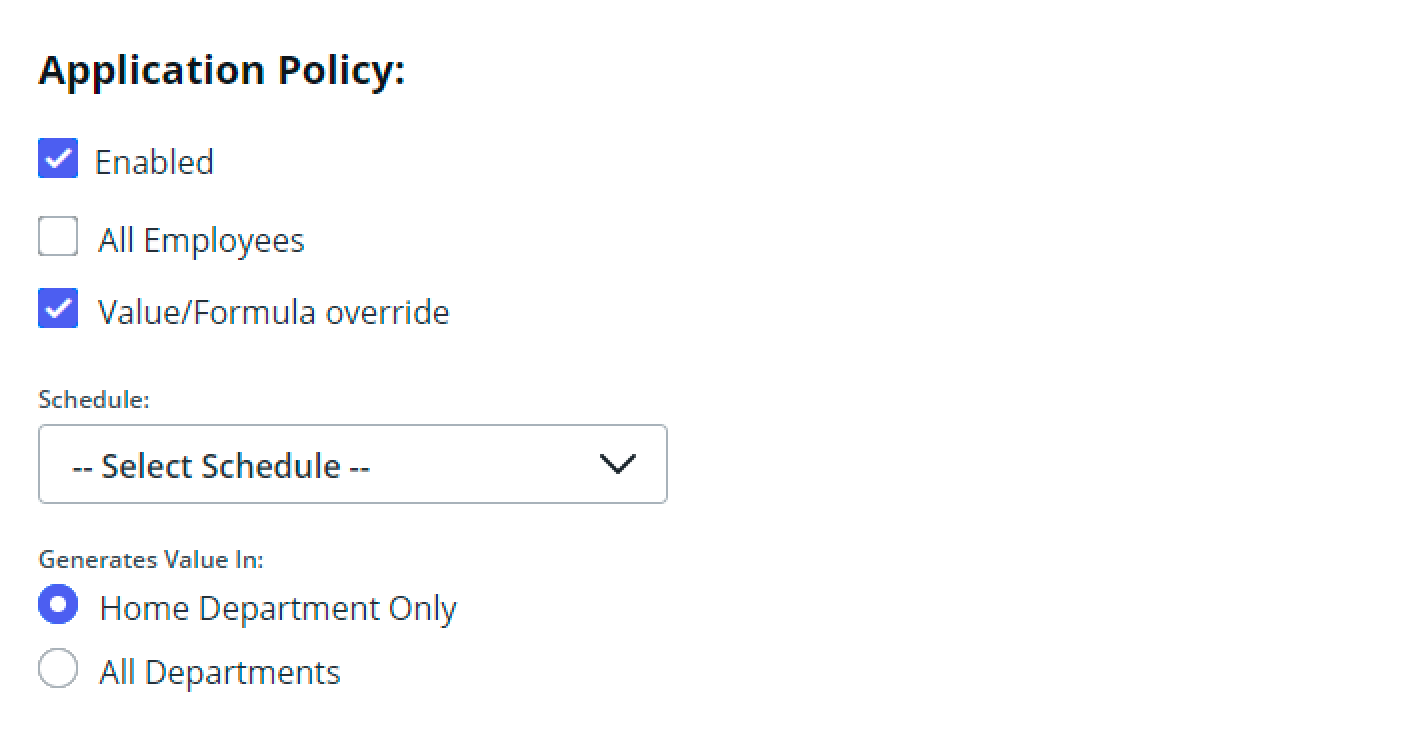
2. The next section is the Application Policy.
Enabled: You will want to make sure that this check box is checked to make sure the instruction is usable. If you later decide this payroll instruction should not be used anymore, you can unselect this option to disable it.
Generates Value In: Generally, for benefits, you will want to keep it as Home Department Only. This means any default values will be entered only into the home department for the employee. If you select All Departments then a box will exist for every department an employee works in (and default values will pre-populate every available box, duplicating values).
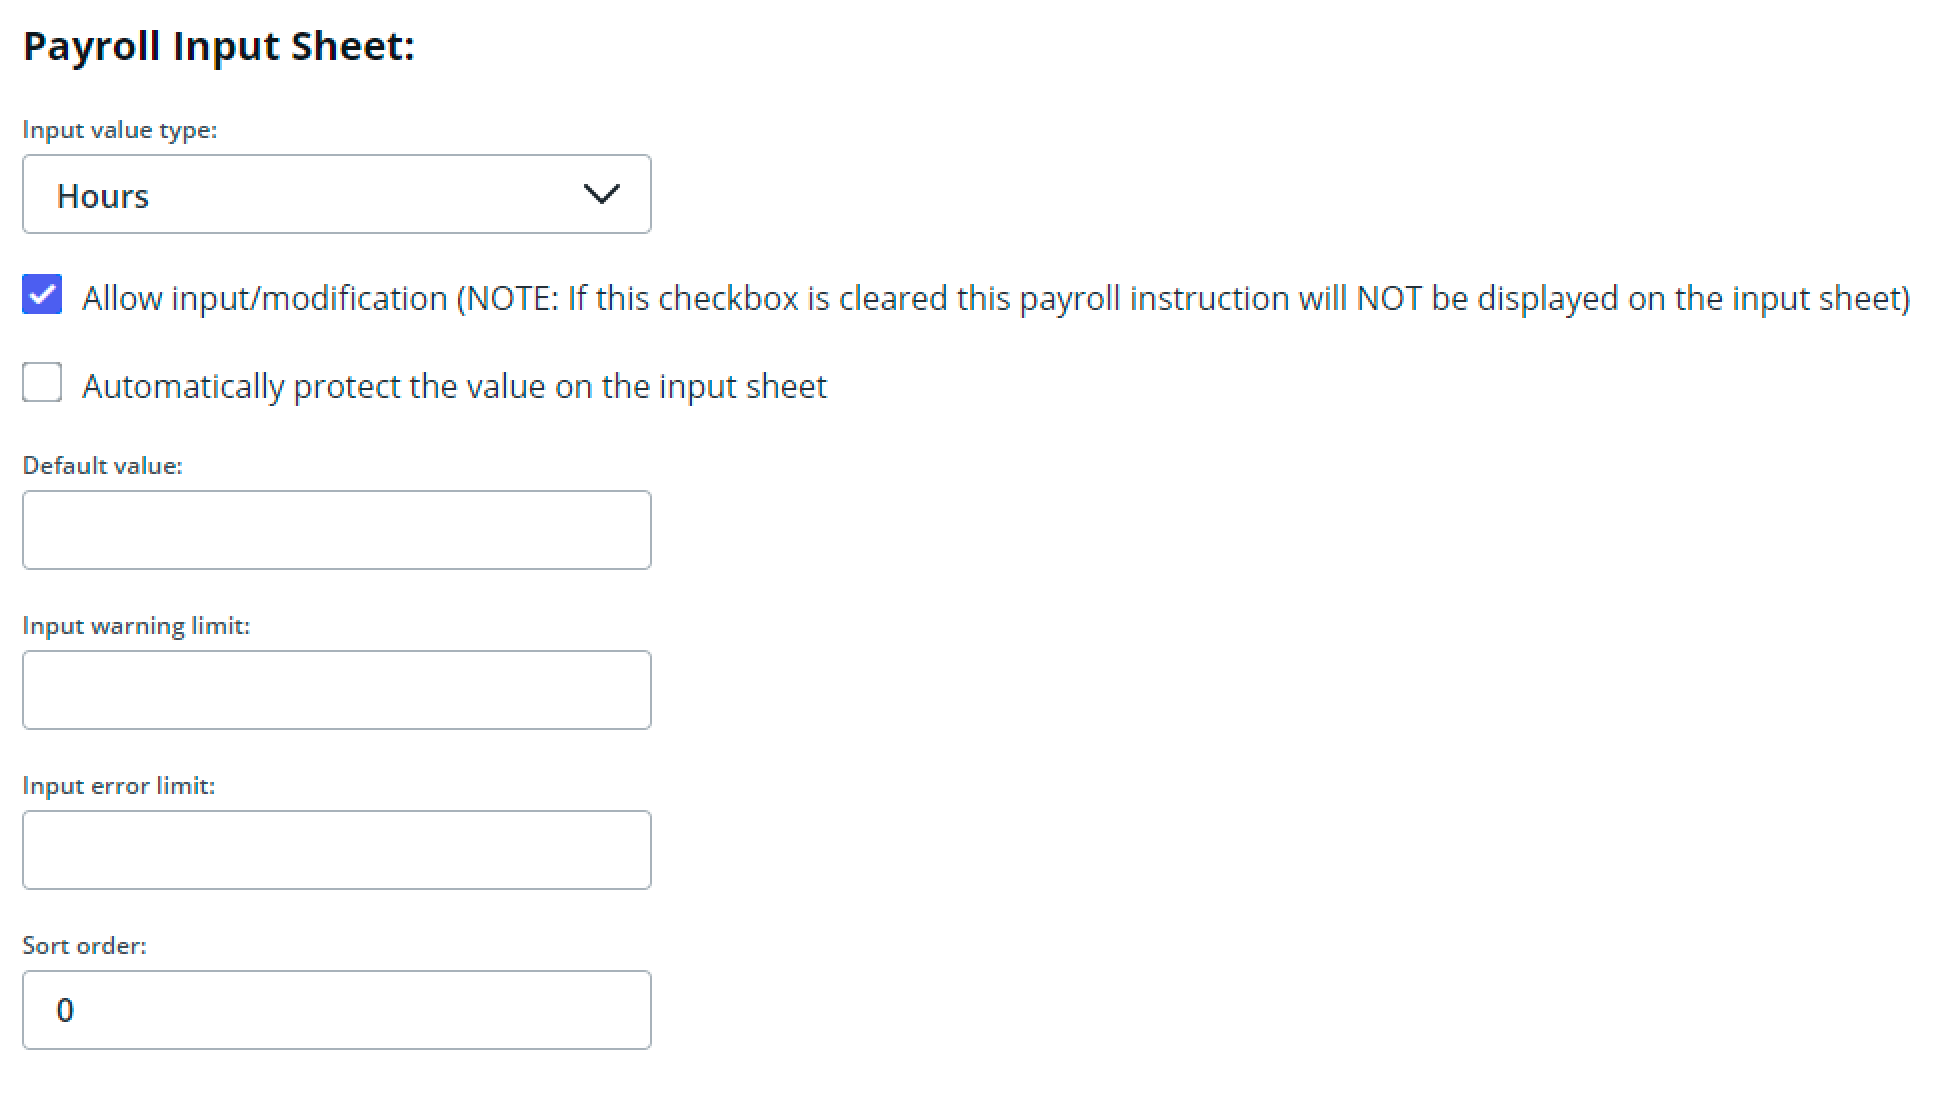
Hours: Hours are included in the insurable hours total, which appears on the statement of earnings and is important for the ROE.
Money: Depending on the source deduction settings below, money will appear as taxable/insurable/pensionable income.
None: These entries are used when you are tracking a value not relevant to money or hours.
Percent: Any value entered will be divided by 100, commonly used in combination with a formula calculation.
Units: Commonly used in combination with a formula calculation (2 units at $50 per unit = $100).
Default Value: If you want a value to auto-populate for all employee's who have this instruction (see Applies to in the Application Policy section), enter that value here. Otherwise, a 0 will pre-populate unless a default entry has been specified at an employee level.
Input warning limit: If a value is specified here, any amounts entered that go above that value will produce a warning on the Errors/Warnings report available on the results page of a processed pay run.
Input error limit: If a value is specified here, any amounts entered that go above that value will produce an error on the Errors/Warnings report available on the results page of a processed pay run. Errors must be resolved before a pay run can be approved.
Sort order: This allows you to sort your payroll instructions on the input sheet - smallest number to the left. For more information, check out our How do I organize my payroll instructions article.
4. The Instruction Value represents what formulaic calculations should happen to values entered into this payroll instruction (if any). If you simply want the input to equal the output, select A fixed value or captured by the payroll input sheet. If you want the system to do some math for you before outputting a value, the mathematical formula can be entered by selecting Determined using a formula and entering the calculation in the entry box. If you need assistance entering formulas, please contact our support team. The Formula Code is a unique identifier so this instruction could be referenced in another instructions calculations. We suggest using the instruction name again (spaces will automatically be removed).
5. Now we come to one of the most important sections, the Instruction Behaviour section.
Non-taxable or Taxable: You may want to reference the CRA Benefits and Allowances Chart, to determine if this benefit is taxable.
Periodic or Non-Periodic: If the instruction is taxable, this details how it is taxed. For more information about the difference, check out our article explaining What are periodic and non-periodic earnings?
Canada Pension Plan (CPP): If this instruction is pensionable, check this box.
Employment Insurance: If this instruction is insurable, check this box.
Suppress from Statement of Earnings: Selecting this box will hide this instruction from the employee by removing the value from the statement of earnings.
7. Click Save.
Related Articles
Create an earning pay code
There are three types of earning payroll instructions. If you wish to enter a number of hours into the input sheet and have the hours calculate at the hourly or salary rate outlined in the employee's compensation policy, you will need to set up an ...
Create a deduction pay code
1. Open Payroll, click Payroll, and then click Payroll Setup. 2. In the Payroll Instructions tab, click on Add New Deduction. Options within the setup screen 1. The first section is titled Details. You will need to enter both the English and French ...
Pay an employee retroactively
If you want to pay an employee retroactively, you can pay them using an ad-hoc pay run to ensure that they receive their pay as soon as possible without having to wait for your next scheduled pay run. 1. Retroactive pay should be labeled as such to ...
Add payroll instructions
Who can use this feature? Users with Payroll Organization Admin role Available on Start , Grow , and Optimize plans. Introduction Payroll instructions are fundamental building blocks in Rise Payroll. They calculate and track the amounts of earnings, ...
Organize (sort) payroll instructions
Assigning a sort order to payroll instructions The system allows for the assignment of a "sort order" for each payroll instruction. Earnings, Benefits, and Deductions will always stay within their respective categories, but within each category, the ...